What it is
Scheduled Send is a feature that lets you compose a message now (reply or new) but schedule it to go out at a future date and time (up to 90 days ahead). Instead of sending immediately, it waits until your chosen delivery time.
You can schedule messages from a few spots in the interface (New Conversation modal, Message Hub reply builder, or directly from the Scheduled Messages page).
Why it matters / Value proposition
-
Better timing, better reception: You can send messages at appropriate local times (e.g. business hours) even if you're working late or off hours.
-
Pre-planning & efficiency: Compose messages ahead and let the system take care of sending later.
-
Reminder / follow-ups made easy: Good for reminders (appointments, deadlines), follow-ups, or messaging someone first thing in the morning.
Overview
Small businesses and sole proprietors that rely on personal 1-to-1 messaging are often working around the clock. They may have several text messages that they need to reply to at the end of the day after normal working hours. They also may need to send reminders to clients about appointments coming up in the next day or so. In these scenarios, they need to reply, but schedule the delivery for a reasonable time for their clients.
To meet this need, Voxie has built a Scheduled Send feature that supports users who need to schedule a message to their contacts that will be delivered in the future at a selected day and time.
Accessing Scheduled Send
Messages can be scheduled from multiple pages when logged into a Voxie team.
-
New Conversation modal
-
Response Builder in Message Hub
-
Scheduled Messages page
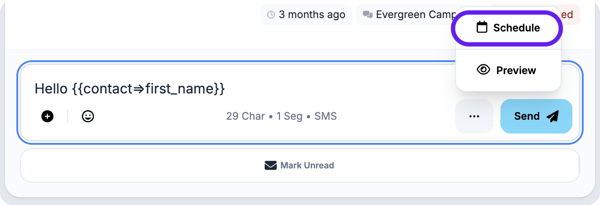
Within the New Conversation modal and the Message Hub Response Builder, Scheduled Send can be found as the clock icon next to the send button on the bottom right corner of the modal.
New Conversation modal:
To schedule a message via the New Conversation modal:
- Click the New Conversation button
- Select the contact or create a new one per existing flow.
- Type and format the message, including templates, variables, emojis, and attachments
- When the message is formatted, click the Schedule mode icon that is next to the Send button

- You are now in Schedule mode. The initial day selected is the current day and the initial time selected is 1 hour from the current time. You can change these values and select a day and time up to 90 days from today. To go back to Send mode, click the Schedule mode icon again. In this example, the current day is 8/20/2025 and the message is being scheduled as a reminder to be sent at 1pm the next day 8/25/2025.
Message Hub Response Builder:
To schedule a message via the Response Builder:
- Type and format the message, including templates, variables, emojis, and attachments
- When the message is formatted, click the Schedule mode icon that is next to the Send button.
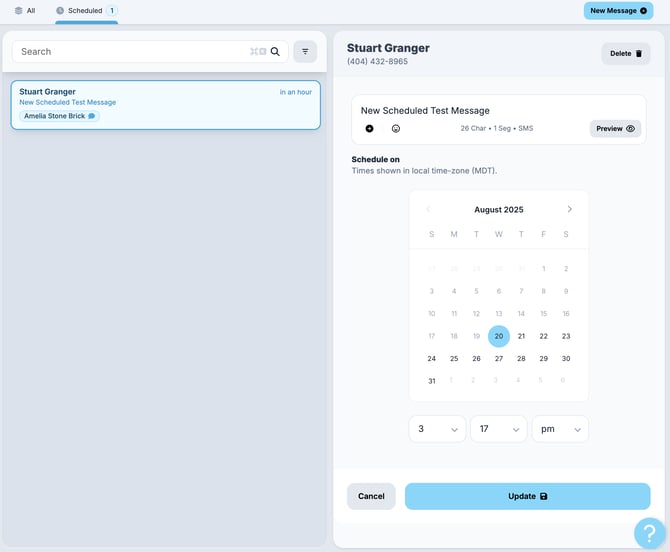
- When you finish selecting the date and time, click the Schedule button to send this message to the Scheduled Messages list. The message will be sent at the selected time. In this example, the current date is 8/20/2025, but it is after working hours and the user wants to send a text to the contact first thing the next day (8/25/2025 at 3:17 pm):
Message Hub - Conversion Section:
After you have scheduled a message to a contact, when you are viewing that contact in the Conversation Window, you can show or hide the scheduled messages for that contact:
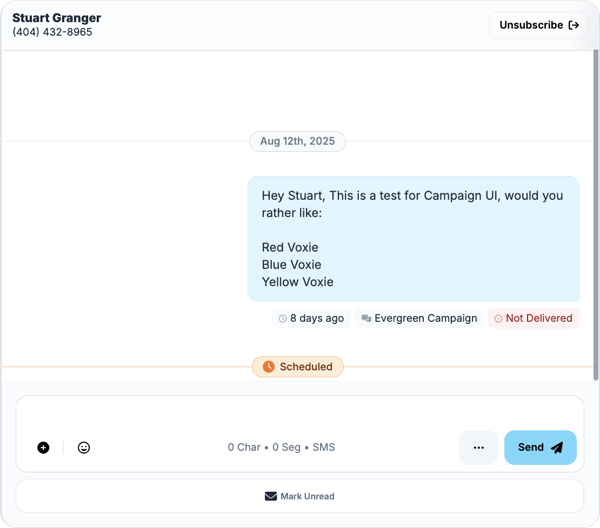
You can edit the scheduled message body or day and time by clicking the Edit Scheduled Message icon shown to the right of the message body:

Managed Scheduled Messages
From the Scheduled Messages Section within Message Hub page, you can:
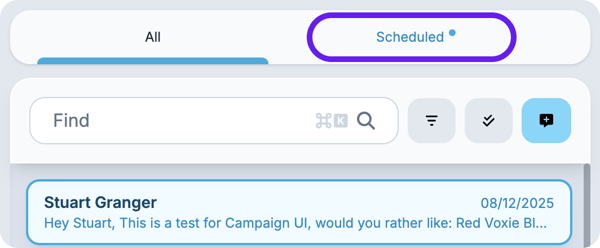
- See all pending scheduled messages
- Edit a pending scheduled message
- Delete a pending scheduled message
- See all sent scheduled messages
- Create a new scheduled message
